
Automatically Share Your Google Reviews to Facebook
Turn your great Google reviews into social media content automatically!
With Review Posting in the Social Planner, you can automatically share new Google reviews to your Facebook Page. Once your automation is set up, the system will look for eligible new reviews and publish them according to the schedule you choose.
Before You Begin
Before setting up automatic review posts, make sure:
- Your Google Business Profile is connected so your Google reviews can be pulled into the platform.
- Your Facebook Page is connected so review posts can be published to Facebook.
- Your reviews are appearing under Reputation > Reviews.
Important: The automation only uses eligible reviews received after you create the review automation. Older reviews will not be automatically posted.
Step 1: Connect Your Facebook Page
Your Facebook Page must be connected before reviews can be automatically published.
- From your dashboard, go to Reputation > Settings > Integrations.
- Locate the Facebook integration.
- Follow the prompts to connect your Facebook account and select the Facebook Page you would like to use.
- Confirm that your Facebook Page shows as connected.
If your Facebook connection becomes disconnected or expires in the future, you may need to reconnect it before automated review posts can continue publishing.
Step 2: Confirm Your Google Reviews Are Connected
Next, make sure your Google Business Profile is connected and your reviews are coming into the dashboard.
Navigate to:
Reputation > Reviews
You should see your recent Google reviews listed here.
The Social Planner pulls reviews from the Reputation area, so your Google Business Profile connection needs to remain active for the automation to work properly.
Step 3: Open the Social Planner
Navigate to:
Marketing > Social Planner
Select New Post, then choose Post Reviews.
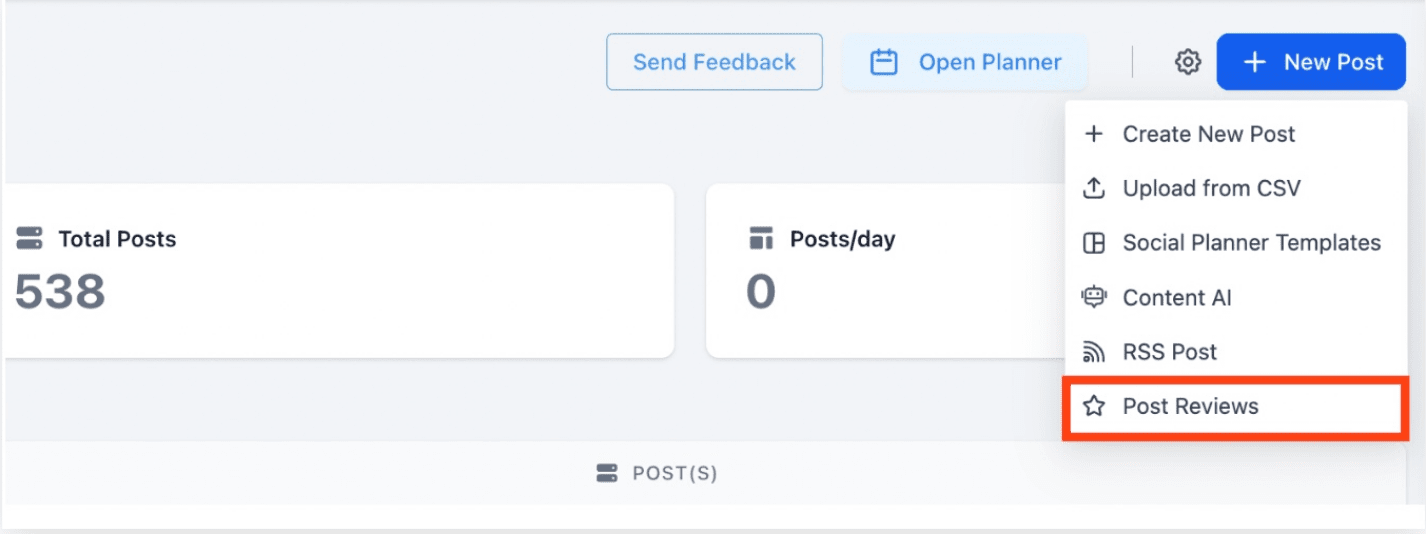
This opens the Review Posting setup where you can decide which reviews should be shared and where they should be published.
Step 4: Choose the Reviews You Want to Share
Select Google as the source for your reviews.
Next, choose the star-rating range you want the automation to use.
For example, if you only want to highlight your happiest customers, you might choose to share only 5-star reviews.
You can also choose the maximum number of eligible reviews that can be published each time the automation runs.
Good to know: Only reviews containing written comments can be automatically shared. Reviews that contain a star rating but no written feedback are skipped.
Step 5: Choose Where the Reviews Will Be Posted
Select the connected social media account where you would like your reviews published.
To automatically share your Google reviews on Facebook, select your connected Facebook Page.
Depending on the social accounts available to you, you may also be able to publish review content to additional connected social platforms.
Step 6: Set Your Posting Schedule
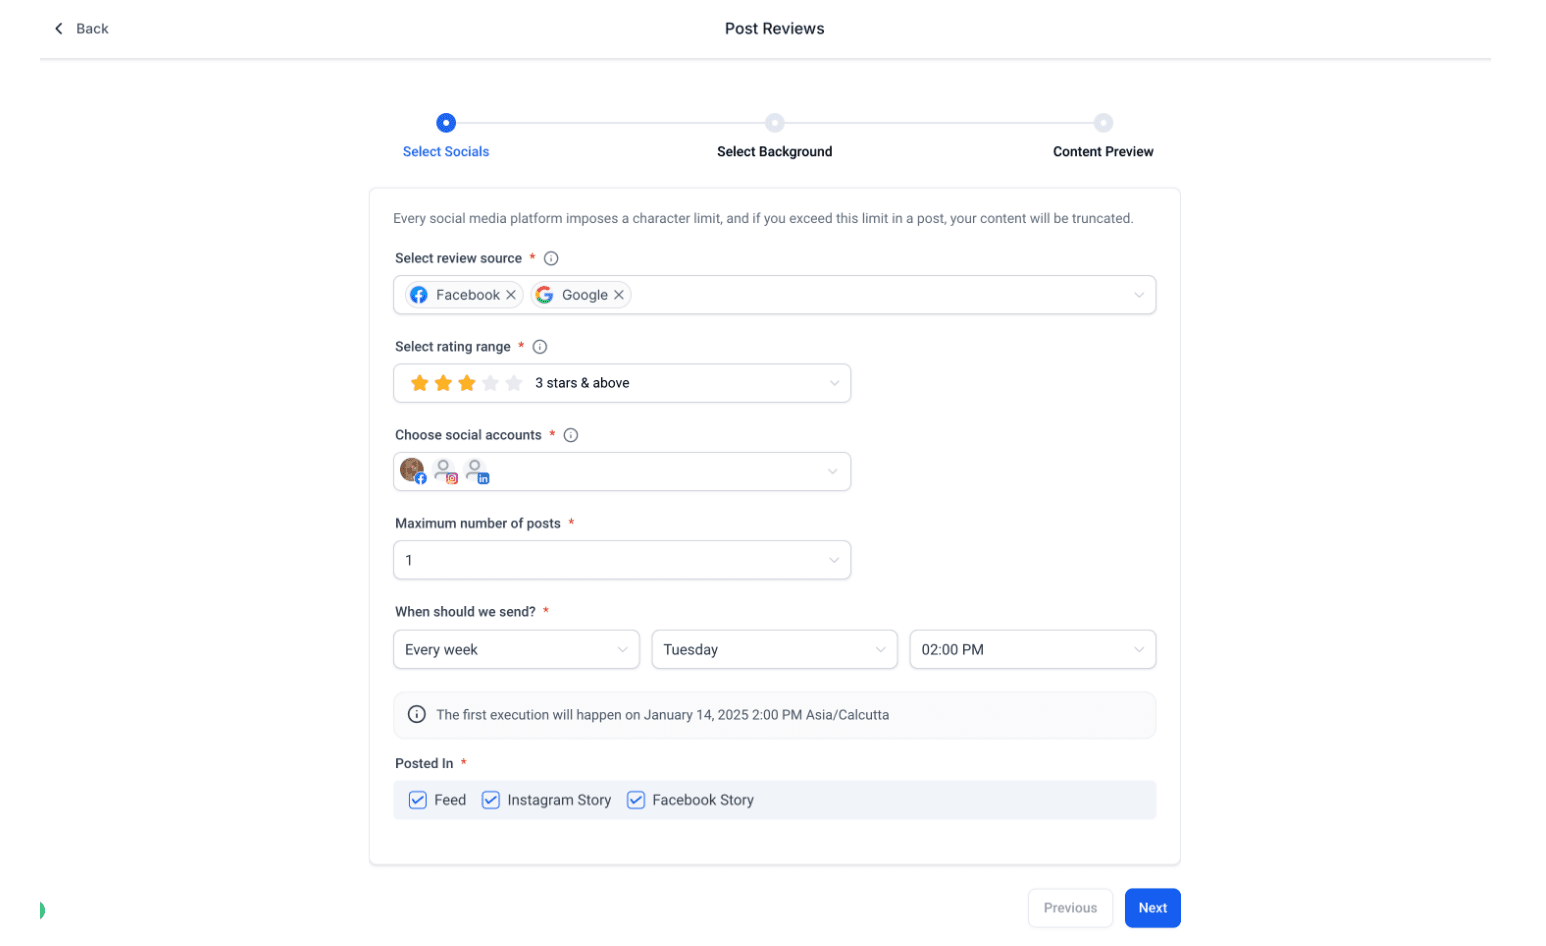
Under When should we send?, choose how frequently you would like the automation to run.
You can schedule review posts to run:
- Daily
- Weekly
- Monthly
Then select your preferred posting time.
The scheduled time follows the timezone configured for your account.
How does the number of posts work?
The maximum post count determines how many reviews can be published when the automation runs, not how many times the automation runs.
For example, if you select Weekly and choose a maximum of 3 posts, the automation can publish up to three eligible reviews on the scheduled day each week.
It does not spread those three posts across different days of the week.
Step 7: Customize Your Review Posts
Now you can customize how your reviews will look when they’re shared.
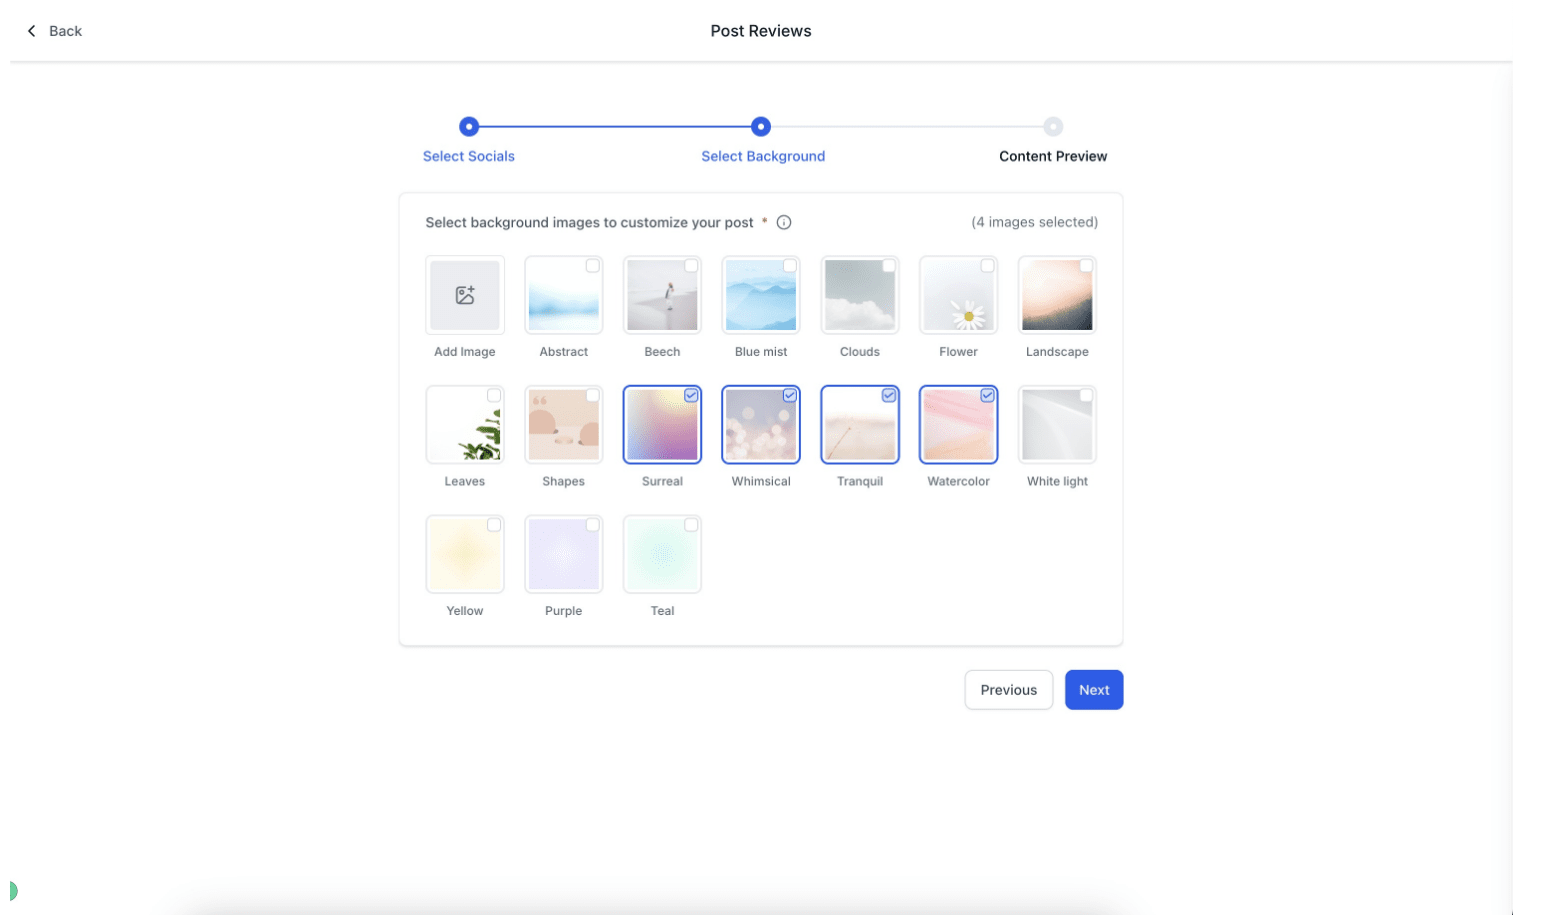
You can:
- Choose or upload background images.
- Add multiple background options.
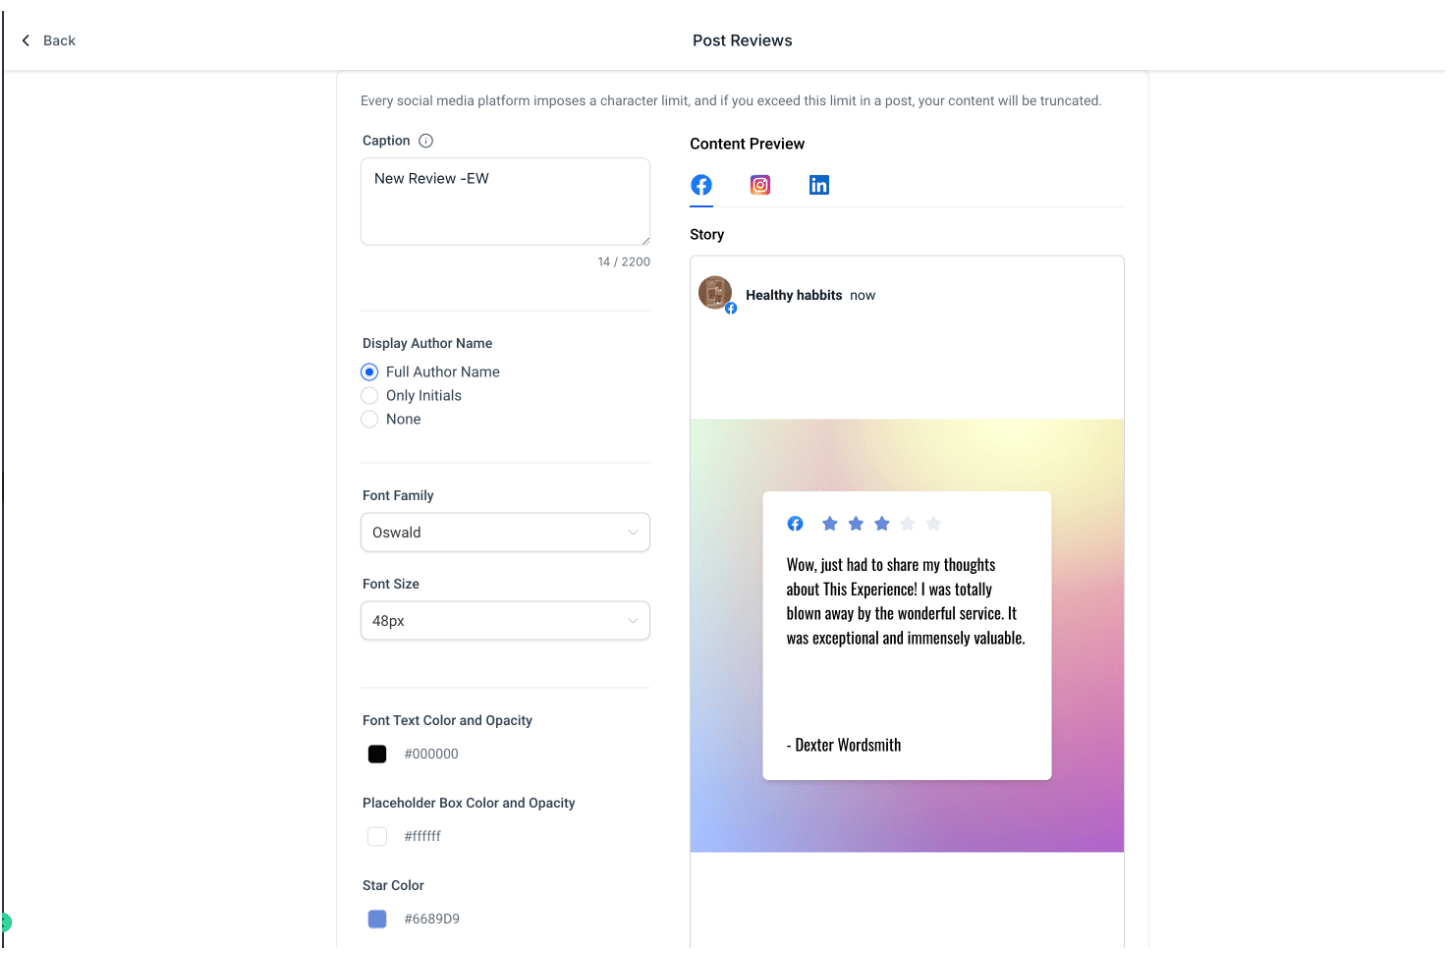
- Customize the font family, size, and color.
- Adjust the background and star colors.
- Adjust opacity.
- Add a custom caption or use the review itself as the caption.
- Choose how the customer’s name appears, such as their full name, first name, or initials.
For uploaded backgrounds, use JPEG or PNG images in a 1:1 square ratio, with a maximum file size of 5 MB.
Before finishing, preview your review post to make sure it matches your brand and looks the way you’d like.
Step 8: Activate Your Automation
Once you’re happy with your design and schedule, complete the setup to activate your review automation.
From that point forward, eligible new reviews can automatically be turned into social posts based on the schedule you’ve selected.
That’s it! Your Google reviews are ready to become Facebook content automatically.
Managing Your Review Automation
You can return to the Social Planner at any time to manage your automation.
Go to:
Social Planner > Content > Review
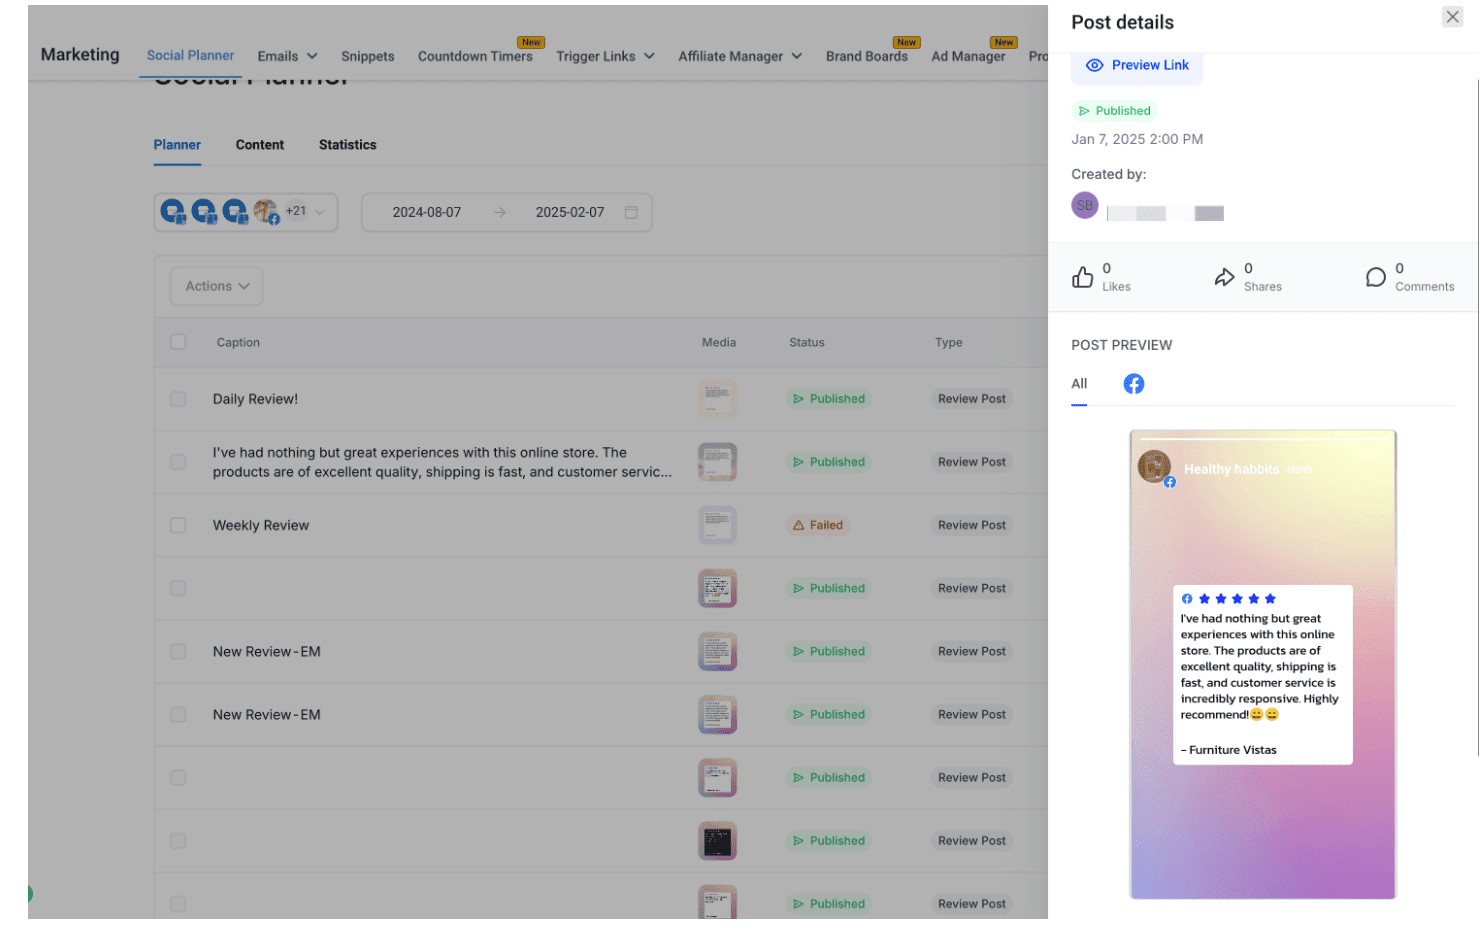
From here, you can:
- Pause your automation
- Edit your automation
- Change the schedule
- Update your design
- Delete the automation
Important Things to Know
Only new reviews are included.
Google reviews posted before you created the automation will not be automatically published.
The review must include written feedback.
A star-only review without written comments will be skipped.
There must be an eligible review available.
If no eligible new reviews are available when the automation runs, the scheduled post may be skipped. If your automation repeats, the system can check again on the next scheduled date.
Keep your integrations connected.
If your Google or Facebook connection expires or becomes disconnected, review posting may stop. Reconnect the account under your Integrations settings to resume publishing.
Your scheduled time uses your account’s timezone.
You may occasionally see a different time displayed internally due to system or server timezones. This does not change the actual scheduled publishing time.
Frequently Asked Questions
Can I customize what accompanies my review?Yes. You can add a custom caption or use the review content as the caption. You can also customize the visual design of the review post.
Can I choose which reviews are posted?
Yes. You can select the review source and choose the star-rating range the automation should use.
Can I preview the post before publishing?
Yes. Use the preview during setup to see how your review post will look before activating the automation.<
Why aren't my reviews being posted?
First, check that your Google Business Profile and Facebook Page are still connected.
Also confirm that:
- The review was received after you created the automation.
- The review contains written feedback.
- The review meets the star-rating criteria you selected.
- Your review automation is active and has not been paused.
Can the automation post reviews I received before I set it up?
No. Automated review posting only considers eligible reviews received after the review automation was created.
What happens if I don't receive any new reviews?
Nothing will be posted if there isn’t an eligible review available when the automation runs. If you’ve created a repeating schedule, the system can check again the next time the automation is scheduled to run.
Where can I edit or pause my automation?
Go to Social Planner > Content > Review. From there, you can manage your existing review automation.