Managing Your Tags
When you log in to your Dashboard and go to the Subscribers tab, you’ll see options for tag management.
In your subscribers list you’ll see a column on the right side for “Tags.” You may or may not see a tag icon showing next to some of your subscribers. You’ll see the tag icon if you’ve previously added a tag to that subscriber.
There’s also a “Manage Tags” button located in the top right that we’ll explain shortly.
Single tag – a quick visual that only one tag was added to the subscriber.
Double tag – a quick visual that you’ve added more than one tag to the subscriber.
If no tags have been added you’ll see a plus icon ; you can click it to add a tag.
Quick View – If you see a tag icon on a subscriber and want to take a quick peek of what tag is tied to them, just take your mouse and hover over the tag in the column. You’ll see a little popup appear that lists the tag(s).
Click Tag to Modify – If you’d like to modify the tag(s) added to a subscriber, simply click the tag icon and your tag editing options will become available. Use the check boxes available to edit the tags, or add a new tag, click save and you’re all set!
Tag Management How To’s
- Create a Tag
- Delete a Tag
- Rename a Tag
- Assign or Remove a Tag
- Filter by a Tag
- Send an Email to a Tag List
![]()
Create a Tag
There are a couple ways you can create a new tag. You may have seen the “Tags” field when adding a new subscriber. You can continue to enter a new tag in this field, or choose from your most frequently used tags. You’ll also find a “Manage Tags” button at the top right of your Subscribers tab.
- After logging in to your Dashboard, click the Subscribers tab.
- Click the Manage Tags button, located top right of the page.

- Click Add New Tag then just type the name in the field.
- Click Save and you’ll see the new tag has been added to your list.
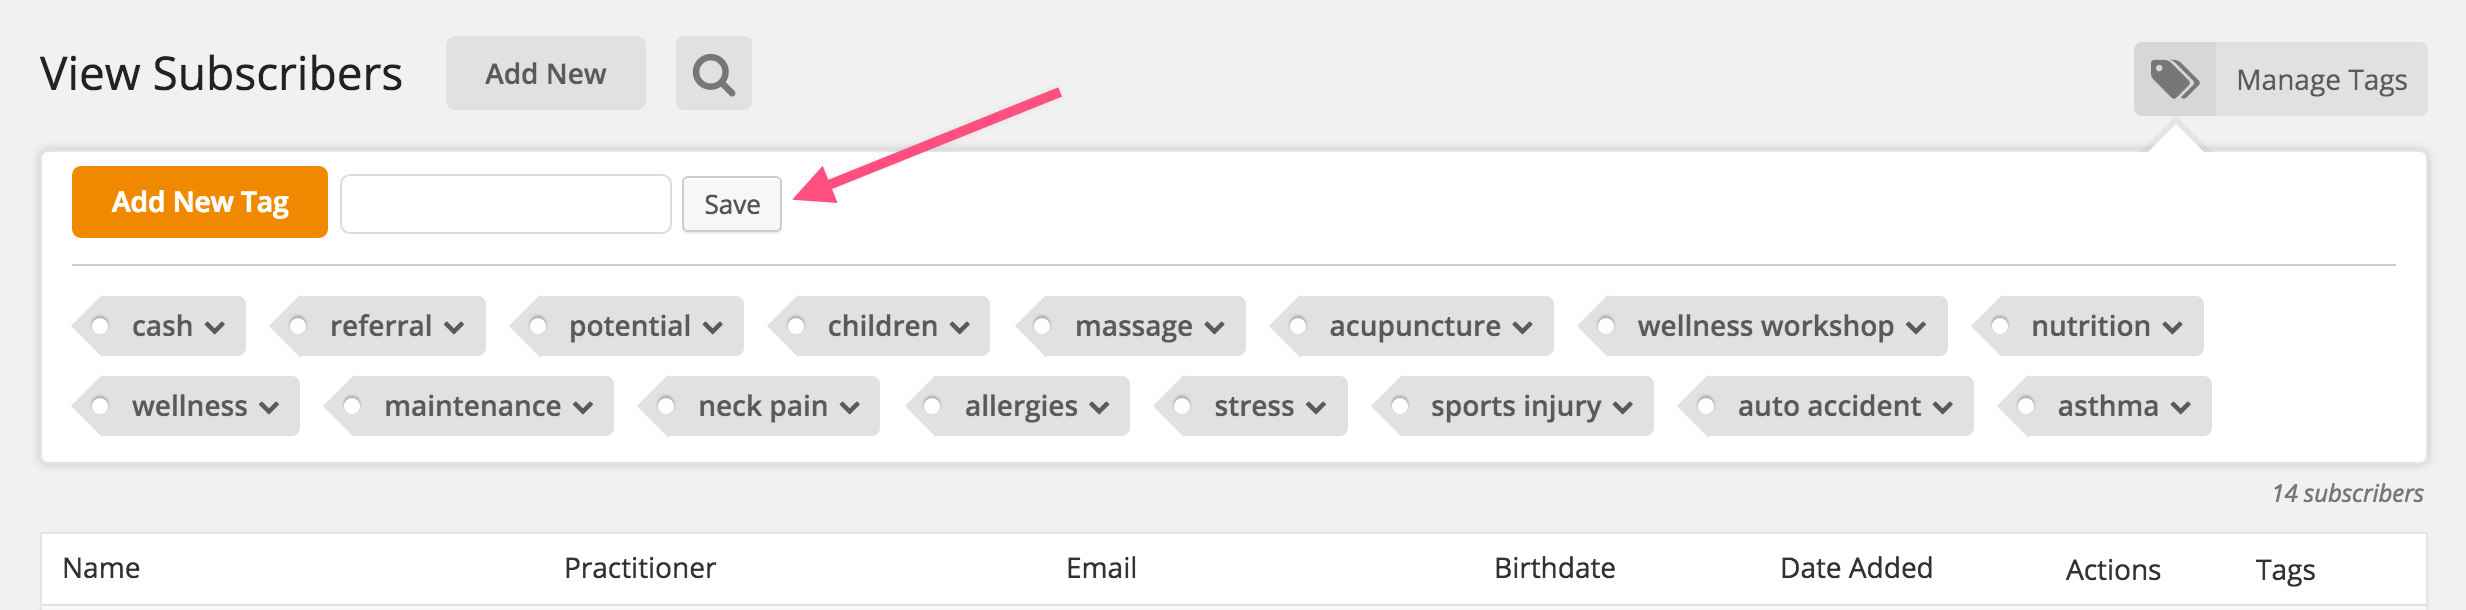
Tags created in “Manage Tags” will not be assigned to any subscribers. Any subscribers that you assign to a tag will show within the tag’s “view all” list. Once more than one subscriber has been assigned to a tag, you’ll then see the option to “Send Email” in the dropdown menu of the tag.
Delete a Tag
Need to delete a tag? No problem, its easy!
- After logging in to your Dashboard, click the Subscribers tab.
- Click the Manage Tags button, located top right of the page.
- Click the down arrow of the tag you want to remove, then select Delete Tag from the menu.
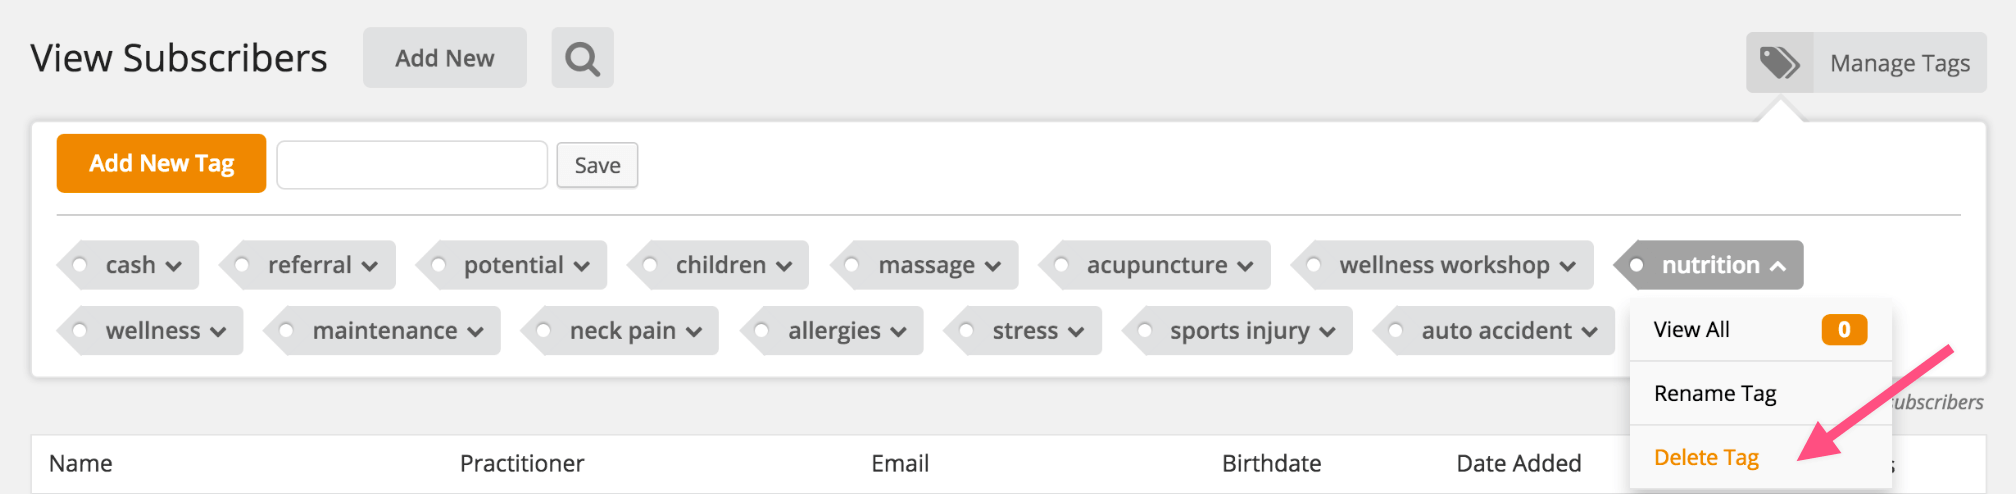
- You’ll see a pop-up message asking if you’re sure. Click Yes to delete.
Deleting a tag will remove it from all subscribers associated with it. Don’t worry, no subscribers will be deleted in this process, only the tag.
![]()
Rename a Tag
Changed your mind or made a typo and need to rename your tag? Don’t fret, easy fix!
- After logging in to your dashboard, click the Subscribers tab.
- Click the Manage Tags button, located top right of the page.
- Click the down arrow of the tag you want to rename, then select Rename Tag from the menu.
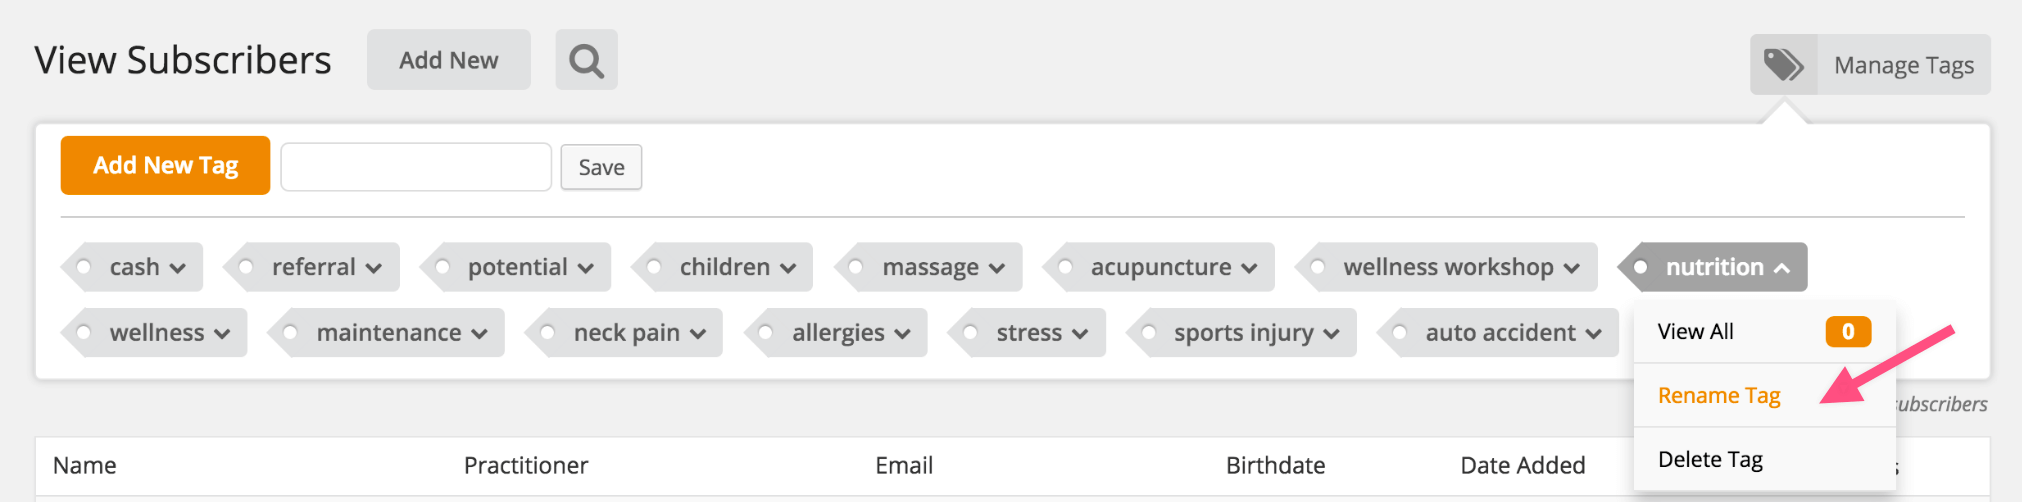
- Type the new name in the field, then click the Rename Tag button.
When you rename a tag, it will automatically update the tag name on any subscribers which were previously assigned to it.
![]()
Assign or Remove a Tag from a Subscriber
Assigning a Tag
- After logging in to your dashboard, click the Subscribers tab.
- In the Tags column of your Subscribers list, click the plus symbol next to the Subscriber you wish to assign a tag to, or click the tag icon (a tag icon will show if you previously assigned a tag to the subscriber).

- Click the checkbox of the tag(s) you wish to assign to the subscriber, or add a new tag.
- Click Save and you’ll see the new tag has been assigned to the subscriber.
Subscribers can have as many tags associated with them as you need.
Removing a tag
Follow the same process as above, except simply uncheck the tag you wish to remove from the subscriber, and then click Save.
![]()
Filter by a Tag
- After logging in to your dashboard, click the Subscribers tab.
- Click the Manage Tags button, located top right of the page.
- Click the down arrow of the tag you want to filter by, then select View All from the menu.
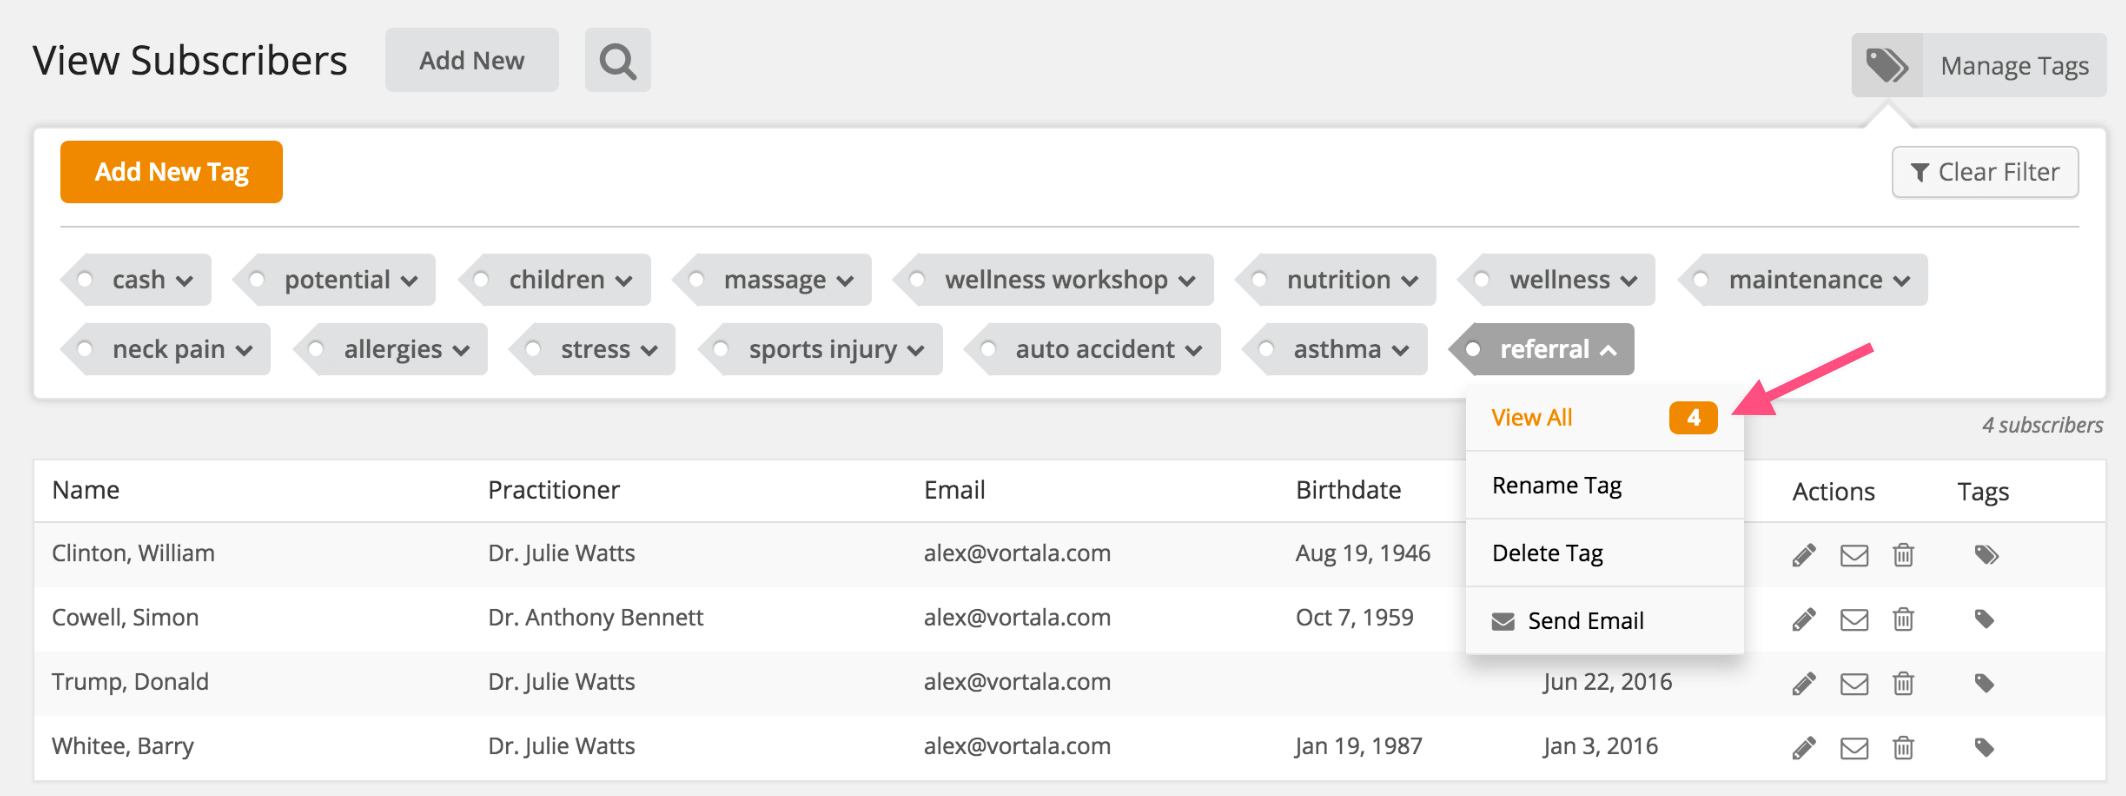
- You can clear the filter by clicking the Clear Filter button (which shows under the “Manage Tags” button when your list has been filtered).
![]()
Send an Email to a Tag List
- After logging in to your dashboard, click the Subscribers tab.
- Click the Manage Tags button, located top right of the page.
- Click the down arrow of the tag you want to email, then select Send Email from the menu.
- The “Send Email” feature will open, and will pre-select “Custom List” from the “To” dropdown menu, and automatically populate the checkbox of the tag you selected to send an email to. From there you can further filter your list, choose a template as a starter, or simply start typing out your email.
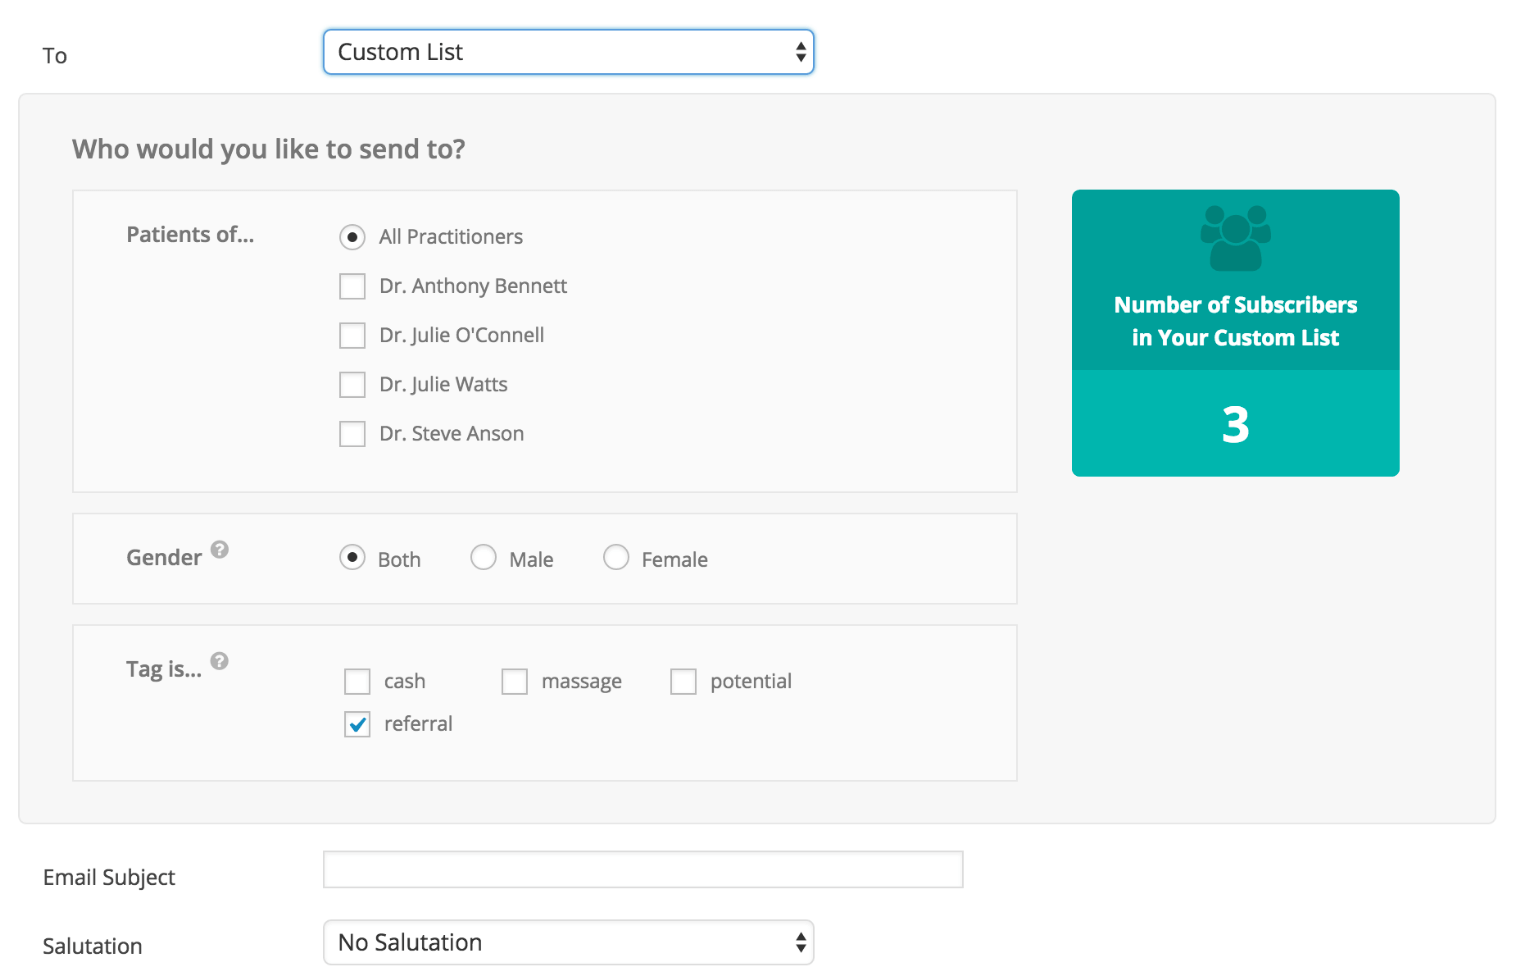
- Alternatively, you can go directly to your Email tab, choose Custom List from the “To” dropdown menu, and start building your custom list.
![]()