Webmail
Please review the ‘Email Hosting & Usage Guidelines’ to ensure our email service is the right fit for you and your clinic.
– Email Hosting & Usage Guidelines
– Best Practices For Sending Email
– Perfect Patients – Webmail Overview
Webmail FAQ’s
How do I set up an email address for a new staff member?
To set up a new Perfect Patients hosted email address, please email support@perfectpatients.com or contact your Website Success Manager (Premiums only) to submit your request.
Our team will setup the new email address for you and then provide you with all the details.
How can I check my domain-hosted email online?
Traveling or need to check your email from the web? Use Webmail to easily access your email accounts hosted by Perfect Patients.
Can I log into my domain-hosted email from my website Dashboard?
Yes! You will find ‘Webmail‘ on the top right of the Dashboard, and this will allow you to log into Webmail.
Adding a Mobile Phone Number
Adding a Mobile Phone Number
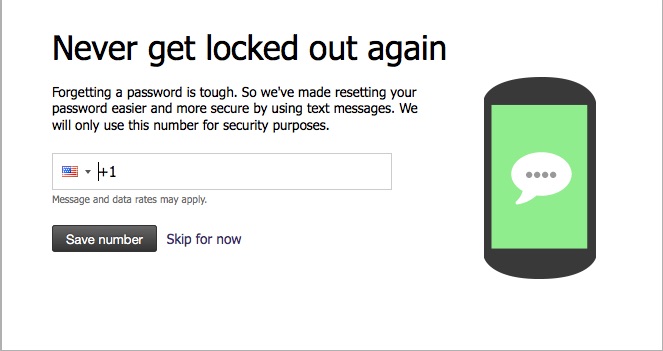
Our Email Host offers the ability for the mailbox owner to recover and reset their password ONLY if they set up mobile SMS verification in their webmail account first.
You can add your mobile phone number by logging into webmail
» Go to the upper right hand corner and click on the 3 white lines
» and then select ‘Update Phone’
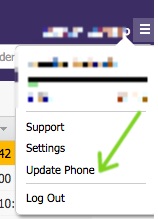
Follow the prompts to add a mobile or change a mobile number
I forgot my email password!
Forgot your password? Click here and then click on Forgot Password and follow the instructions. [*This will work if you’ve added your Mobile Phone number in webmail. The directions are above.]
Still need help? Contact support@perfectpatients.com or your Website Success Manager (Premiums only) to request your Perfect Patients hosted email password be reset.
Can I change my Password in Webmail?
If you are already logged into Webmail
then follow the directions below to reset the password to your personal preference.
- Click Settings in the upper right corner.
- Select ‘Change Password’.
- Enter your current password
- Enter the new password of your choice. The new password must be at least 8 character long and include at least three of the following:
- An uppercase letter
- A lowercase letter
- A number
- One non-alphanumeric (!, $, #, %, etc)
- Re-enter the new password to confirm.
- Click ‘Save’.
Can I have this email forward to my other email address? How do I set it up?
Yes, you can have your domain-based email forwarded to one of your other email addresses.
- You will set this up from your webmail account,
- Click on the three white bars at the top far right side of the page by your name.
- This will open a small box. Click on ‘Settings’
- This will open up a larger pop-up box.
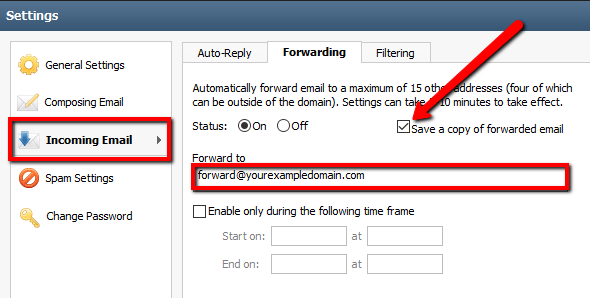
- Click on ‘Incoming Email’ » ‘Forwarding’
- Change Status to ON
- Check ‘Save a copy of forwarded email’
[Warning: If Save a copy of forwarded email is not checked, this mailbox will not store any messages sent to it.]
- Add in the email you want this to forward to
- Press ‘Save’
*It can take 5-10 mins for the forward to be set.
(Please note: Perfect Patients cannot guarantee that messages will successfully be received if forwarded to other services (such as Gmail, Hotmail, or any non-Perfect Patient address). Factors beyond our control, including external spam filters and mail routing problems, may prevent message delivery. )
How do I set an auto-reply on my email account?
Please Note: An auto-reply needs to be set up in your webmail account and NOT in an email client, like Outlook or Mac Mail. If you set it up in your email client, you may receive multiple auto-replies from anyone who uses a confirmation or auto-reply email setting, like support@perfectpatients.com.
- From your webmail account, click on the three white bars at the top far right side of the page.
- This will open a small box. Click on ‘Settings’
- This will open up a larger pop-up box. Click on ‘Incoming Email’
- Turn the Status ON for ‘Auto-Reply’.
- Enter your message in the ‘Auto-Reply Message’ Area.
- Check the ‘Enable’ box.
- Add in your start and end date and time.
- Click ‘Save’
You’re all set! Your auto-reply will start and stop automatically on the day and time you selected.
How do I add a signature in webmail?
Step 1: Webmail Settings
- Go to Webmail to access your email account.
- Click on the three white bars at the top far right side of the page
- This will open a small box. From here, click on ‘Settings’.
- This will open up a larger pop-up box. Click on ‘Composing Email’
- Select the ‘Signatures’ tab.
Step 2: Create Your Signature
- Click the ‘Add New Signature’ button.
- Give the signature a name.
- Enter your message in the ‘Edit Signature’ area and click ‘OK’.
- Select when and where you’d like the signature to appear.
- Click ‘Save’
Step 3: Set Signature Options:
Signature Options
- Select the OK button to return to the Settings window.
- Click the name of your signature file from the Current Signatures list in order to select it and choose any of the additional options below.
- To automatically insert the signature when composing a new email, select the “Always show signature when composing an email” check box.
- To automatically insert the signature when you are replying to an email, select the “When replying to an email, insert my signature” check box. Also, specify whether the signature should appear above or below the body of the message. [I find above works best.]
- To automatically insert the signature when you are forwarding an email, select the “When forwarding an email, insert my signature” check box. Also, specify whether the signature should appear above or below the body of the message.
Step 4: Update Identities
NOTE: Please follow the sets below. If you don’t, it won’t know to set your new signature up as your DEFAULT SIGNATURE. It will say (Default) but you need to click on ‘Edit’ to actual add the Default signature in!
- After you’ve selected your signature options,
- Select Identities,
- Double-click on your email address
- Enter the following information in the spaces provided.
- Full Name - This will appear in the “From” field of messages you send.
- Email Address – Enter the email address that should be displayed as the “From” email address.
- Reply To – Enter in the email address that you want recipients to use when they reply to your email message. If you leave this field blank, the address you entered in the Email Address box will be used automatically.
- Default Signature – Select a signature that should be used with this identity.
- When you’re finished, select OK.
Step 5: Default Identity
- To change your default identity selection,
- Click once on the identity as it appears in the Current Identities box,
- Select the Set as Default button,
- and then select the Save button when finished.
How can I edit or change the 'from' name/appearance?
When sending an email the ‘from’ appearance can be changed in webmail
- Under Top Right 3 lines
- Settings
- Composing
- Identities
- Click on the current default
- Select Edit
- Change it to whatever you want it to be
- Click OK and Save
Is there a faster way to delete my trash?
Yes, when you are in your Trash, simply right-click. You will see the option to ‘Purge Trash’. Click on this and it will delete everything from your trash.
I'm receiving a MailQuota warning, what do I do?
You’ll need to access your Webmail account to clear it from old emails that are no longer needed.
Once you log into your webmail account, purge or delete email from the following folders:
- Spam
- Junk
- Sent
Once these three folders have been cleared of old emails, you can then purge your trash.
Note: If you right click on any of these folders from within Webmail, you’ll see a purge option. When you purge these folders, the emails will be deleted permanently. Please make sure you back up any emails you wish to save into a folder/print out what you need if you intend to save it.
How can I add an email address to my safelist in webmail?
- Go to Webmail to access your email account.
- Click the three white lines beside your email address.
- Click on Settings.
- Click on Spam Settings » Safelist.
- Add in the email address you want to make sure you receive.
- Click ‘Add’ and ‘Save’.
Is my calendar in webmail shareable?
Yes, you can manage your appointments and meetings through our webmail interface. You can share your calendar, create personal calendars, import events, and add shared calendars within your domain.
On the Calendar tab they are shared here»
You add ‘shared calendar’ by clicking the + sign first, and then you can create a new personal calendar and select to share with contacts that have the same domain
To set up a new Perfect Patients hosted email address, please email support@perfectpatients.com or contact your Website Success Manager (Premiums only) to submit your request.
Our team will setup the new email address for you and then provide you with all the details.
Traveling or need to check your email from the web? Use Webmail to easily access your email accounts hosted by Perfect Patients.
Yes! You will find ‘Webmail‘ on the top right of the Dashboard, and this will allow you to log into Webmail.
Adding a Mobile Phone Number
Our Email Host offers the ability for the mailbox owner to recover and reset their password ONLY if they set up mobile SMS verification in their webmail account first.
You can add your mobile phone number by logging into webmail
» Go to the upper right hand corner and click on the 3 white lines
» and then select ‘Update Phone’
Follow the prompts to add a mobile or change a mobile number
Forgot your password? Click here and then click on Forgot Password and follow the instructions. [*This will work if you’ve added your Mobile Phone number in webmail. The directions are above.]
Still need help? Contact support@perfectpatients.com or your Website Success Manager (Premiums only) to request your Perfect Patients hosted email password be reset.
If you are already logged into Webmail
then follow the directions below to reset the password to your personal preference.
- Click Settings in the upper right corner.
- Select ‘Change Password’.
- Enter your current password
- Enter the new password of your choice. The new password must be at least 8 character long and include at least three of the following:
- An uppercase letter
- A lowercase letter
- A number
- One non-alphanumeric (!, $, #, %, etc)
- Re-enter the new password to confirm.
- Click ‘Save’.
Yes, you can have your domain-based email forwarded to one of your other email addresses.
- You will set this up from your webmail account,
- Click on the three white bars at the top far right side of the page by your name.
- This will open a small box. Click on ‘Settings’
- This will open up a larger pop-up box.
- Click on ‘Incoming Email’ » ‘Forwarding’
- Change Status to ON
- Check ‘Save a copy of forwarded email’
[Warning: If Save a copy of forwarded email is not checked, this mailbox will not store any messages sent to it.]
- Add in the email you want this to forward to
- Press ‘Save’
*It can take 5-10 mins for the forward to be set.
(Please note: Perfect Patients cannot guarantee that messages will successfully be received if forwarded to other services (such as Gmail, Hotmail, or any non-Perfect Patient address). Factors beyond our control, including external spam filters and mail routing problems, may prevent message delivery. )
Please Note: An auto-reply needs to be set up in your webmail account and NOT in an email client, like Outlook or Mac Mail. If you set it up in your email client, you may receive multiple auto-replies from anyone who uses a confirmation or auto-reply email setting, like support@perfectpatients.com.
- From your webmail account, click on the three white bars at the top far right side of the page.
- This will open a small box. Click on ‘Settings’
- This will open up a larger pop-up box. Click on ‘Incoming Email’
- Turn the Status ON for ‘Auto-Reply’.
- Enter your message in the ‘Auto-Reply Message’ Area.
- Check the ‘Enable’ box.
- Add in your start and end date and time.
- Click ‘Save’
You’re all set! Your auto-reply will start and stop automatically on the day and time you selected.
Step 1: Webmail Settings
- Go to Webmail to access your email account.
- Click on the three white bars at the top far right side of the page
- This will open a small box. From here, click on ‘Settings’.
- This will open up a larger pop-up box. Click on ‘Composing Email’
- Select the ‘Signatures’ tab.
Step 2: Create Your Signature
- Click the ‘Add New Signature’ button.
- Give the signature a name.
- Enter your message in the ‘Edit Signature’ area and click ‘OK’.
- Select when and where you’d like the signature to appear.
- Click ‘Save’
Step 3: Set Signature Options:
Signature Options
- Select the OK button to return to the Settings window.
- Click the name of your signature file from the Current Signatures list in order to select it and choose any of the additional options below.
- To automatically insert the signature when composing a new email, select the “Always show signature when composing an email” check box.
- To automatically insert the signature when you are replying to an email, select the “When replying to an email, insert my signature” check box. Also, specify whether the signature should appear above or below the body of the message. [I find above works best.]
- To automatically insert the signature when you are forwarding an email, select the “When forwarding an email, insert my signature” check box. Also, specify whether the signature should appear above or below the body of the message.
Step 4: Update Identities
- After you’ve selected your signature options,
- Select Identities,
- Double-click on your email address
- Enter the following information in the spaces provided.
- Full Name - This will appear in the “From” field of messages you send.
- Email Address – Enter the email address that should be displayed as the “From” email address.
- Reply To – Enter in the email address that you want recipients to use when they reply to your email message. If you leave this field blank, the address you entered in the Email Address box will be used automatically.
- Default Signature – Select a signature that should be used with this identity.
- Full Name - This will appear in the “From” field of messages you send.
- When you’re finished, select OK.
Step 5: Default Identity
- To change your default identity selection,
- Click once on the identity as it appears in the Current Identities box,
- Select the Set as Default button,
- and then select the Save button when finished.
When sending an email the ‘from’ appearance can be changed in webmail
- Under Top Right 3 lines
- Settings
- Composing
- Identities
- Click on the current default
- Select Edit
- Change it to whatever you want it to be
- Click OK and Save
Yes, when you are in your Trash, simply right-click. You will see the option to ‘Purge Trash’. Click on this and it will delete everything from your trash.
You’ll need to access your Webmail account to clear it from old emails that are no longer needed.
Once you log into your webmail account, purge or delete email from the following folders:
- Spam
- Junk
- Sent
Once these three folders have been cleared of old emails, you can then purge your trash.
Note: If you right click on any of these folders from within Webmail, you’ll see a purge option. When you purge these folders, the emails will be deleted permanently. Please make sure you back up any emails you wish to save into a folder/print out what you need if you intend to save it.
- Go to Webmail to access your email account.
- Click the three white lines beside your email address.
- Click on Settings.
- Click on Spam Settings » Safelist.
- Add in the email address you want to make sure you receive.
- Click ‘Add’ and ‘Save’.
Yes, you can manage your appointments and meetings through our webmail interface. You can share your calendar, create personal calendars, import events, and add shared calendars within your domain.
On the Calendar tab they are shared here»
You add ‘shared calendar’ by clicking the + sign first, and then you can create a new personal calendar and select to share with contacts that have the same domain
Computer and Smartphone Setup Guides

We look forward to hearing from you!