MacMail IMAP Email Setup Guide
The following guide should help you make your way through setting up email on your computer, iPhone or iPad. There may slight be differences between my images and your phone or iPad. If you have any trouble, please don’t hesitate to let us know and we’ll be happy to walk you through it.
Username: Full email address (example: bob@drbob.com)
Hostname: secure.emailsrvr.com
Incoming Port: 993
Outgoing Port: 587 (sometimes 465 if outgoing mail is not working).
SSL: Enabled
Update Your Temporary Password
The password we’ve provided is a TEMPORARY password only; it is NOT secure. PLEASE make sure that you update it immediately. To change your email password, first log into the account via webmail.
- Select Settings in the upper right corner under your name
- Select Change Password
- Enter the Current Password (you were provided with this at the time of account creation)
- Enter the New Password of your choice
- Re-enter the New Password to confirm
- Click Save
We recommend that you always change your password before adding your email account to Outlook or a phone, that way you do not have to go back in later to change it.
Please scroll to the next page to begin setup.
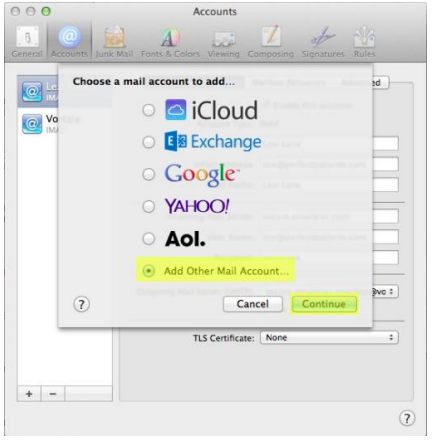
Step 1: Set Up Account
Click on Mail in the upper left corner of MacMail. Select Add Account and then select Add Other Mail Account.
Step 2: Add Email Account
In the box that appears, you need to fill out:
Full Name: Your Full Name
Email Address: Your FULL email address
Password: Your selected password
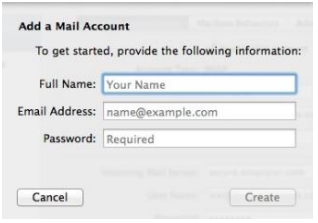
Click Create.
Step 3: Incoming Mail Sever Info
Account Type: IMAP
Mail Server: secure.emailsrvr.com
Username: Your FULL email address
Password: Your selected password
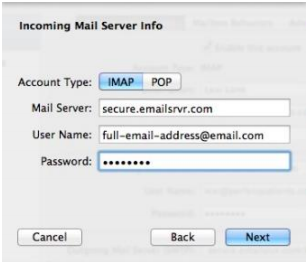
Click Next.
Step 4: Outgoing Mail Server Info
SMTP Server: secure.emailsrvr.com
User Name: Your FULL email address
Password: Your selected password
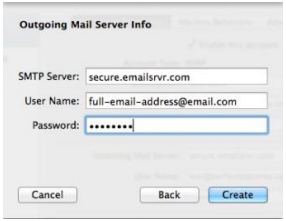
Click Create.
Step 5: Account Information
You need to access your Account Information by selecting Mail » Preferences » Accounts.
On the account page, select your new domain-based account that you’ve set up, and it will bring you to the Account Information page.
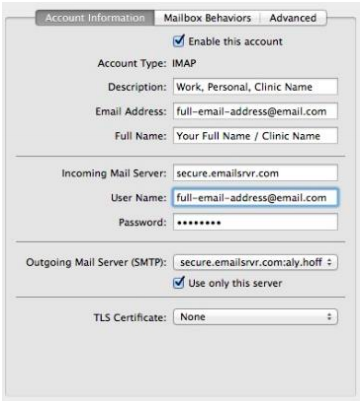
Here you will want to ensure that your setup is similar to the above:
Account Type: IMAP
Description: Work, Personal, Clinic Name
Email Address: Your FULL email address
Incoming Mail Server: secure.emailsrvr.com
Password: Your selected password
Outgoing Mail Server (SMTP): secure.emailsrvr.com (Use only this server)
TLS Certificate: None
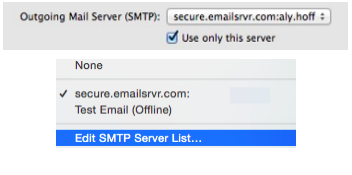
Step 6: Set Outgoing Port
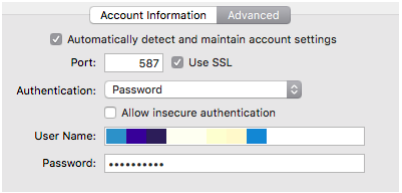
In the Account Information screen, select the drop down next to Outgoing Mail Server (SMTP) and select Edit SMPT Server List. A new window will appear, select the Advanced tab.
Port: 587
Authentication: Password
Username: Your FULL email address
Password: Your selected password
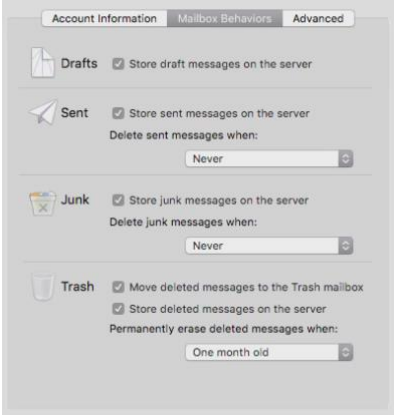
Step 7: Mailbox Behaviors
Select the tab Mailbox Behaviors. Please ensure that it is set up exactly as it shows below.
Drafts: Store draft messages on the server
Sent: Store sent messages on the server
Delete sent messages when: Never
Junk: Store junk messages on the server
Delete sent messages when: Never
Trash: Move deleted messages to the Trash mailbox
Store deleted messages on the server
Permanently erase deleted messages when: One month old
Step 8: Advanced Options
On the Advanced tab, select the following options:
Automatically detect and maintain account settings
Include when automatically checking for new messages.
IMAP Path Prefix: This may say “INBOX” (this is fine)
Port: 993 (Use SSL enabled)
Authentication: Password

You’re finished!

Still have questions? Don’t hesitate to call or contact us at support@perfectpatients.com. We look forward to hearing from you!